

Start here
Planning Your Backsplash Project
Next
Tools and Materials You'll Need
Then
Preparing the Wall Surface
When you're ready
Setting the Tile
Final step
Grouting and Finishing
Planning Your Backsplash Project
Before you buy a single tile, spend time planning. A well-measured, well-designed backsplash is far easier to execute than one you're figuring out as you go.
Start by identifying the area you want to cover - most commonly the wall between your countertop and the upper cabinets. Measure the width and height of each section, multiply to get square footage, and then add 10-15% to your total for cuts and breakage. This buffer prevents a frustrating mid-project supply run.
Next, choose your tile. For beginners, standard 3×6-inch subway tiles or mosaic mesh-backed sheets are the easiest to handle. Larger format tiles can look stunning but require more precise leveling and cutting. Consider the grout color at this stage too - it affects the finished look significantly.
Thin-set mortar
A cement-based adhesive mixed with water, used to bond tile to walls or floors. More durable and moisture-resistant than mastic, making it a good choice near heat or water sources.
Mastic
A pre-mixed organic tile adhesive that is easier for beginners to use than thin-set. Best suited for drier wall areas away from direct water exposure.
Grout float
A flat, rubber-faced tool used to press grout into the joints between tiles and spread it evenly across the surface.
Grout haze
A thin, cloudy film of dried grout residue left on the tile face after grouting. It can be buffed away with a dry cloth before it fully hardens.
Tile spacers
Small plastic cross-shaped pieces placed at tile corners during installation to keep grout lines even and consistent throughout the project.
Notched trowel
A trowel with a serrated edge that creates uniform ridges in adhesive, helping tiles bond firmly and evenly to the wall.
Finally, think about your layout before you buy. A straightforward grid pattern is the most forgiving for a first project. Herringbone or diagonal patterns require more cuts and careful planning.
Tools and Materials You'll Need
Having everything on hand before you begin saves time and keeps momentum going. Here's what a first-time backsplash installation typically requires:
- Tile adhesive (mastic or thin-set mortar): Mastic is easier for beginners and works well in low-moisture areas. Thin-set is more durable and recommended near the stove or sink.
- Notched trowel: Used to spread adhesive evenly on the wall.
- Tile spacers: Small plastic crosses that keep grout lines consistent.
- Tile cutter or wet saw: For trimming tiles to fit edges and corners.
- Level and pencil: Essential for keeping rows straight.
- Grout and grout float: For filling the joints between tiles after adhesive cures.
- Grout sealer: Protects finished grout from moisture and staining.
- Painter's tape and drop cloths: To protect countertops and cabinets.
Do a Dry Layout Before You Commit
Before spreading any adhesive, lay your tiles out on the countertop in the pattern you plan to use. This lets you visualize the finished look, catch any spacing issues, and pre-cut border pieces - saving significant time once you start working on the wall.
You can rent a wet saw from most home improvement stores if you don't want to purchase one outright.
Preparing the Wall Surface
Wall prep is the step beginners most often rush - and skipping it is the most common reason a backsplash fails early. Tile adhesive bonds best to a surface that is clean, dry, and structurally sound.
Turn off the power to any electrical outlets in the work area and remove the outlet covers. Clean the wall thoroughly with a degreaser to remove any cooking residue or grease - this is critical in kitchens. Let it dry completely.
Check for any areas where the drywall is soft, damaged, or heavily painted with glossy paint. Sand glossy areas lightly to improve adhesion. If the wall has significant imperfections, skim-coating with joint compound and letting it dry fully will give you a flatter, more reliable surface.
Turn Off Power Before Working Near Outlets
Always switch off the circuit breaker controlling any outlets in your backsplash area before beginning wall prep or tile work. Water, adhesive, and grout near live electrical components create a genuine safety risk. Confirm the power is off with a non-contact voltage tester before proceeding.
Apply painter's tape along the top edge of your countertop and the underside of your upper cabinets to protect finished surfaces from adhesive and grout.
Setting the Tile
With your wall prepped, you're ready to start tiling. Begin by finding the center point of your focal wall - typically the wall behind the stove or sink - and mark a vertical center line with a pencil and level. Starting from the center and working outward ensures your tile pattern is symmetrical and visually balanced.
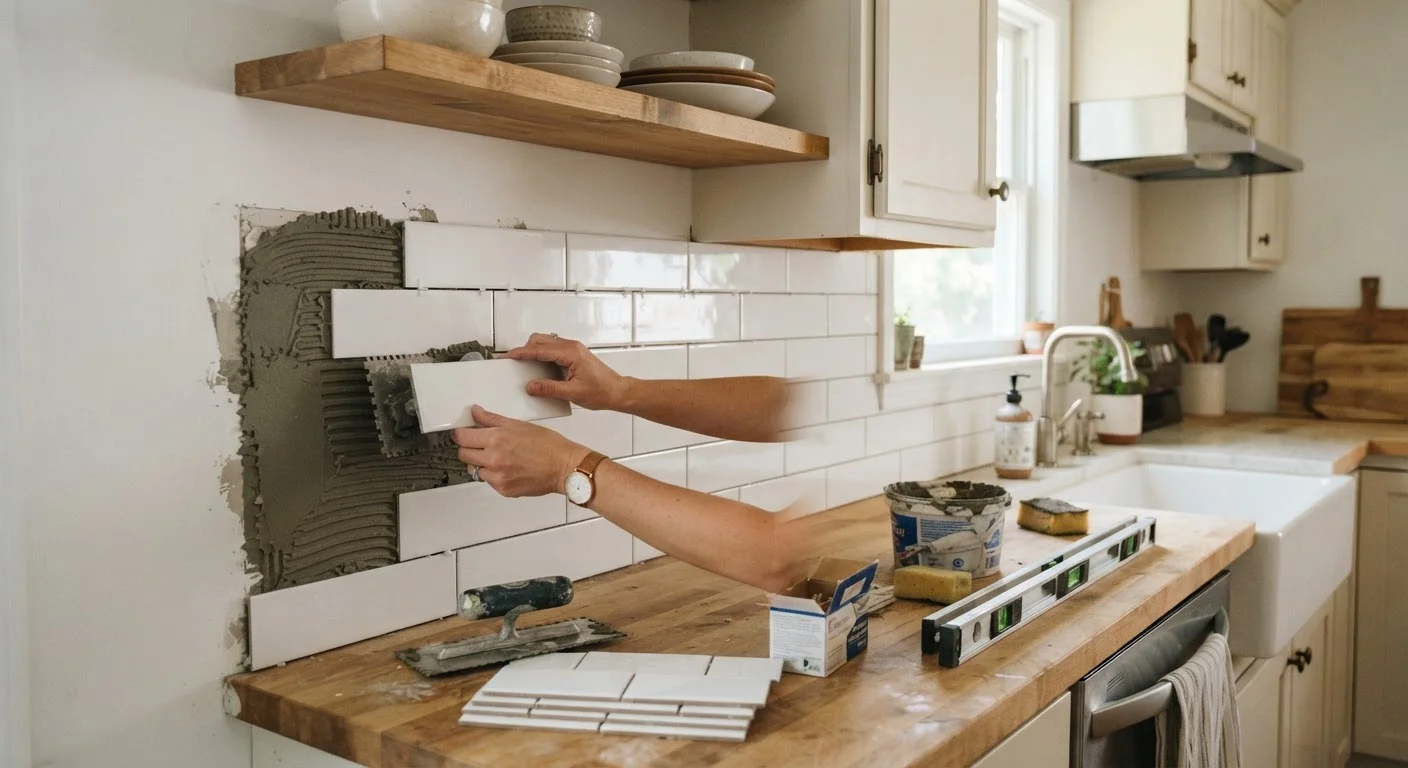
Using your notched trowel, spread a thin, even layer of adhesive on a small section of the wall - about 2 to 3 square feet at a time. Working in small sections prevents the adhesive from drying before you place the tiles.
Press each tile firmly into the adhesive with a slight twisting motion to ensure full contact. Insert tile spacers at the corners to maintain consistent grout line width. Use your level frequently to check that rows are straight - it's much easier to correct now than after the adhesive sets.
Cut border tiles with your tile cutter as needed. Make any outlet cuts carefully, measuring twice before cutting. Allow the adhesive to cure for the time recommended on the packaging - typically 24 hours - before moving on to grouting.
Grouting and Finishing
Once the adhesive has fully cured, remove all tile spacers and you're ready to grout. Mix your grout according to the package instructions until it reaches a peanut butter-like consistency.
Using a rubber grout float held at a 45-degree angle, spread grout diagonally across the tile surface, pressing it firmly into the joints. Work in small sections. After letting the grout sit for about 10-15 minutes (check your product's instructions), wipe the tile faces with a damp sponge in a circular motion to remove the haze. Rinse the sponge frequently.
A light residue - called grout haze - may remain after the first wipe. Buff it off with a dry cloth once the grout has firmed up slightly. Allow the grout to cure for 48-72 hours before applying a grout sealer, which protects the joints from moisture and kitchen grime.
Reattach your outlet covers, peel back the painter's tape, and step back to admire the result. For more on what causes grout to fail over time and how to address it, see our guide on why grout cracks and how to regrout properly.
Caulk the Counter-to-Tile Joint, Don't Grout It
The seam where your tile meets the countertop should be filled with flexible silicone caulk - not grout. Countertops shift slightly with temperature and use, and rigid grout in that joint will crack over time. Choose a caulk color that matches your grout for a seamless appearance.
Frequently Asked Questions
A typical backsplash - covering 15 to 30 square feet - takes most beginners one full weekend. Day one covers prep and tile setting; day two is grouting and sealing after the adhesive cures overnight.
It depends on the condition. If existing tile is securely bonded and the surface is flat, you can tile over it in some situations. However, removing old tile gives you a cleaner, more reliable base and avoids potential adhesion problems.
Subway tiles and mosaic sheets on mesh backing are the most beginner-friendly options. Mosaic sheets especially reduce the number of individual pieces to place and make spacing more consistent.
A manual tile cutter handles most straight cuts and is inexpensive to buy or rent. A wet saw gives cleaner cuts on porcelain or for L-shaped notches. Many home improvement stores offer tile-cutting services if you only need a few specialty cuts.
Wait at least 24 hours after grouting before exposing the backsplash to water or steam. Full grout cure - after which you should apply sealer - generally takes 48 to 72 hours depending on the product and humidity.
In most jurisdictions, a cosmetic tile backsplash does not require a permit. However, requirements vary by location, so check with your local building department if you're unsure - especially if any electrical outlet work is involved.
The content on this site is for informational purposes only and is not a substitute for professional advice. Always consult a qualified professional for guidance specific to your situation.